Pages

Thursday, November 6, 2014

Suspension!

Ok, a little catching up to do after a very busy weekend, and a couple recovery days.

On Friday night & Saturday, we put in about 15 hours of work on suspension parts. We also drove out to meet up with someone with a set of seats. We followed that up with playing musical cars on Sunday at the last auto-x event of the season, and some tasty sushi!


I took our aluminum front LCA, and milled out a pocket for the shock mounts. Same on the back side for the shock mount nuts. Figured they can't work ideally unless they make smooth contact. There's still a lot of material left to support the force.


I also sandblasted & deburred the assorted suspension parts, using my utility vehicle to transport them to work


Friday night we set damping to the middle setting on the Koni coilovers, and put the springs and sleeves into place.

The FFR supplied front upper arms were a little of a challenge to fit into place, as most of the brackets are a bit tight. We started with this one, and looking back, I think it was the tightest of them all. Anyway, it went together, and other areas bolted on without too much fuss!

We'll have to remove the LCA later to drill/paint/rivet some of the firewall, but we wanted to make sure everything fit. We still have the steering rack & front sway to take care of.


Rear suspension was more of the same. Spread the brackets a little, slot spacers into their home, and drop the bolts through. Spent some time looking for all the re-used donor bolts, but got things sorted with a few exceptions.


We also had to assemble the rear axles. FFR provides new shafts, onto which you slide both CV joints & housings. Messy, stinky, slippery CV grease gets everywhere. Also, the smell filled the house.. thanks, central air. Yuck!

Rinse & repeat on the other side..


We took a detour around here to go pick up the seats. Sparco Corsa, and a perfect fit for both of us, and the car too!


And we can stick wheels on it!


Tuesday, October 28, 2014

It's Here! Pickup Day & Inventory

Saturday, we finally took possession of our kit!

We took the drive up to FFR, stopping by the Budget rental truck place on the way. We got in around 9:00, a little later than intended, but still quite good.

We left..early.. to do so.


Once we got there, we looked over our kit, checked body panels where we could, and moved on to check out the factory cars a third time.
The body panels were good for the most part, with some areas of thin or chipped gelcoat. We are following up on if we actually got the new production panels that we were promised, despite requesting the old color, or if we got the old-stock leftovers.
We tried out the Kirkey seat in the red S car again, and do like it. We may go that direction with our build.


With that settled, the FFR guys fired up the forklift, and hooked on their boom. We had brought insulation foam to set the chassis on, and it worked flawlessly.


We strapped it down at all 4 corners, and then another pair at the rollbar.
Then, it was box time. A whole load of them went into the Mazda, and the rest went up at the front of the truck (should have put those in first..)

We signed the paperwork, and were on our way! A three hour drive becomes a whole lot longer in that truck, I have to say.

We had friends arranged to come over a bit after we got home, so we busied ourselves with starting to unload boxes until they arrived.

Working with a pair of 200 sq ft garages, we had to get creative. In anticipation of all the panels, we bought a roll of garden netting. With the help of a couple tall friends, we strung up the majority of the body panels to the ceiling of the other garage.


Then we tackled getting the now-bare chassis out of the truck.
We moved slowly, but with four people, it wasn't too much of a problem. The fifth person shuffled the styrofoam into the garage, so we didn't have to aim carefully for a set of jack stands. We'll put it up in the air later.

It's amazing how big it makes that little garage look..


We took our turns "test driving" the 818, then headed into the house to reward our helpers with beer & pizza. Universal currency.

Sunday & Monday, we focused on inventory.
There were around 9 boxes, probably about 15 pages worth of items. The hardware box was the worst. Other than that, just some assorted brackets that took a bit of process of elimination & research to ID. We finished it in around 3.5 hours. Only two parts on the BOM that weren't present, excluding the known backordered items.

Here's what inventory looks like.. sped up quite a bit.


Wednesday, October 22, 2014

Head assembly & 3 days till pickup!

We've been busy getting ready for the kit pickup, trying to get through as much of the motor buildup as we can without rushing it.

Also after sandblasting and re-assembling the transmission, we hit it with a coat of VHT engine enamel. Shiny!


This week we've gotten both heads built up (valves, springs, retainers) after the machine shop took them out to match the 2.5 chamber diameter. I cleaned up the valve seats and lapped them with our new valves for a tight fit and good seal, then another round of cleaning to make sure there was no abrasive left.

Final Product!
Ti Retainers

Lapped @ Left

Lapped @ Right


EuroExport compressor worked well!


We also got the block back with shiny new 99.75 bores! That'll be the next project.


The machine shop said that the flywheel & pressure plate actually required a bit of balancing, but the crank was pretty good as-is. They still touched it up.

I'll be balancing the rods a little better than Manley does, though they're still down around 1.5g from lightest to heaviest. Pistons are all within 1g, so I'll probably leave those alone.


Our pickup day is fast approaching, Saturday! The 16' truck is reserved, and our friends are lined up to help us unload.

We've also been cleaning up the basement, selling parts at cut rates, throwing some things out.. the space matters more than a few $ worth of plastic bits now.

..However, we might need to open a tire shop to clear out this section of space. Winter tires for 3 cars, race tires for the Miata & Mazdaspeed, an extra set of summer tires for the Miata, and the set of XXRs from the WRX.


Thursday, October 16, 2014

More tools!

In preparation for the motor buildup once we get it back from the machine shop, we've been stocking up on all the necessary tools, primarily .0001" micrometer & bore gauge.
Went with a digital Fowler bore gauge, which I trust for repeatability but not for accuracy. For the accuracy, I got a Mitutoyo 2-3" micrometer. Shiny!
You set up the bore gauge with the micrometer, so from there, it's just relative sizes, and we should easily be able to determine our bearing clearances.


It's fun when you can measure the .0002" oil film on the surfaces of the tool & reference gauge.

I brought the transmission halves to work to clean them up in the blast cabinet also. Didn't have glass bead available, so the aluminum oxide leaves a little bit of dark coloration behind. We might paint with VHT Engine enamel to get everything shiny and prevent repeat oxidation.


Pistons & rods should be showing up in the next couple days.. Perfect timing for getting started on everything this weekend!

We also have a EuroExport brand spring compressor en route, with a cup designed for the GSC Beehive spring retainers, so we'll update with how it works.

In other news, it's been gorgeous here, aside from the scattered downpours. 


Monday, October 13, 2014

Busy busy.. Two week countdown!

We've been quite busy getting things ready, since now we're down to (just under) two weeks till pickup!

The engine is out to the machine shop for boring to 99.75mm with a torque plate for accurate shape, the heads are being chamber matched & adding some headspace to get our CR around 8.3-8.5:1, and we have parts piling up in the living room for the rebuild! (Koni shocks were for my mazdaspeed3, which I auto-x'd this past weekend. Fun!)


We decided on a destroked long rod setup. WRX crank, +2mm rods, and pistons to hit the target CR. We also picked up two sets each of King bearings. Most of the parts came from Fidelis Motorsports, who we're working with on the design of the build, and who will be doing the tuning & datalogging with us.


The bearings are on our rebuilt "front" LSD, and backlash has been set, checked by grease transfer and wear patterns. Looked good to us!


I media blasted the engine case halves before sending them off to the machine shop, so they're.. well, a whole lot cleaner than they were. I didn't have a ton of time, so they're not perfect. Good enough, though!

Before

After


Today I'll be giving the transmission the same treatment, then we can button it up & set it aside with new axle & shaft seals.

We've also started in on the wiring harness.
First out was all of the airbag/SRS system, followed by most of the ABS, radio, AC, etc. Lots of wires left, but we've gotten a good chunk of them out of the way. It started out at 48 pounds. Fourty-eight. We'll see how much we can trim off.

Yikes.


We're also working on turbo selection, though our bank accounts might have to recover a little bit first! We decided to sell the VF22, and are looking at twin-scroll Borg Warner now. Lots of power capability, with spool by 3k rpm or possibly even lower.

Sunday, September 21, 2014

Looks like we'll be building our motor...

The last couple of weeks have been more prep for the kit arrival, which is starting to creep up on us- equal parts exciting and worrying, as we seem to be keeping plenty busy, even before the surprises.

The EJ motors have a Tumble Generator Valve that improves cold emissions, but the rest of the time is just a substantial blocked section of airflow from the intake manifold to the heads. There are a few ways to remove them, we're removing the butterfly & diverter casting, but leaving the rods, motors, and sensors in for now. It'll prevent any more complicated CELs, so we won't have trouble getting it on the road.


For reference,
EJ205: Standard 02 WRX type engine. 2.0L
EJ257: Later STi engine. 2.5L
The hybrid build uses 205 heads, 257 shortblock.
This allows for an easier mesh with the old computer system, as well as potentially improved flow relative to the 2.5L heads. You still get the improved torque of the 2.5L.

Continuing with our improvements, we bought an EJ257 oil pan, which helps retain and scavenge oil for higher reliability under high cornering Gs. The factory service manual dictates using RTV as gasket, and oh boy was the EJ205 one on there well. The previous owner must have installed it from his old engine.  Spent a bit of time with a putty knife & dead blow hammer going around the outside, then gave the corner of the oil pan a few good whacks, and it came off.

We lifted it off to immediate disappointment. The previous owner had indicated a Killer B brand oil pickup was installed, as the factory oil pickups are prone to cracking, starving the engine of oil, and resulting in spun bearings. Nope. Factory. Crap.


We pretty quickly decided that this meant it was time to dig in deeper, and find out what else was missing.

The leaky side valve cover was going to be coming off anyway, so we started there. He had mentioned in person, but not in writing, that there were ARP head studs installed. Nope. Ok, time to go find the factory service manual for pulling the heads.

Yesterday morning we went down to tackle that job. Getting the cam gear/pulleys off was a bit of a pain, as the FSM specifies removing the timing belt first. We wound up using a creative routing, and a pair of vise grips to lock the cams in a safe location, then yarding on the allen bolt with a 3' breaker bar. All came off without tooo much trouble, but the first pair took quite a lot longer than the second pair. Experience, I guess.


Those removed, we pulled the camshafts, keeping close track of which bolt, guide/bearing, etc belongs to each location. Next was the head bolts, which needed the 12 point sockets I'd picked up a few days ago. Heads lifted off easily after a few hammer taps. Rotate the engine stand, rinse, repeat.


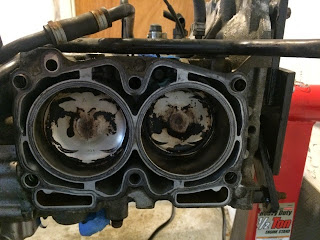
We inspected the pistons, compared lots of pictures online, and determined they were OEM 257 pistons, not the JE low compression pistons that are crucial to a safe hybrid build (noticing a trend)?


Heads were also not machined to match the bore of the 2.5L block. Doesn't seem this is as crucial, but again not as advertised.


Today is a dreary sunday, so we're spending a bit of time researching parts, determining the best build options for a high-revving hybrid motor with moderate power goals. We've officially kissed our old target build cost goodbye (unless we wring some money out of the previous owner), so we're going to do it right this time, rather than running whatever we had until it popped.

If any of the readers have experience with these builds, please chime in.

Friday, September 5, 2014

Parts Parts Parts.. And vacation!

I've been absolutely awful about updates lately, for a couple reasons.

1, Sanding, sandblasting, de-greasing, and brake-parts-cleaning things isn't very exciting.

2, We also just got back from a week long roadtrip vacation in "Frog" our Miata up through Maine, New Brunswick, and around Nova Scotia, including the Cabot Trail. We had a great time, and thoroughly enjoyed the seafood!


Now that we're back, things are starting to come together.
We got our Group N motor & transmission mounts, TGV to intake & block gaskets, Injector seals, OBX "front" LSD, placed a massive Subaru OEM parts order- STi Oil pan, valve cover gaskets, CV joint boots, lots of exhaust related gaskets, etc etc.

We also have finally been making progress on cleaning up parts in a way that feels rewarding. All the calipers are cleaned and painted with the VHT caliper paint, which looks great!


 The axle parts are all cleaned out from LOTS of old grease packed in there. Hint: Degreaser & a rag first, then when it's almost all out, use WD-40 as a solvent to finish, it worked better than brake parts cleaner to thin the grease.

We also painted the OEM header with another VHT product.  Before & After:


We also took another trip up to FFR to check out the new options, sit in the 818S that wasn't available last time we were there, and see the new red R car.
We knew we needed to get a better idea of what to expect with the kit, and it was a valuable trip.

Things we figured out:

  • Wipers are an option, not included. We'll probably have a go at setting up our own, but FFR's kit looks pretty nice.
  • The trunk kit is decent sized, and most of the way ready. We'll probably make our own to fit around the AWIC kit that we've decided to go with.
  • Body panels are not perfect, but they're pretty good. We think we'll be OK with some wrap.
  • Seating and steering positions are pretty good for us, for me, I'll need a rather low seat mount to pass the "broomstick" rule. 
  • Kits will be coming with the "old" gas tank for a while still.
  • Shifter as delivered isn't mushy at all, if anything, it's a bit too mechanical feeling, it'll take some time to get used to. It also sits really high if you don't undermount it in the tunnel. 

Tuesday, July 22, 2014

The shell is gone!

Sorry for the lack of updates lately, we've been spending a bit of the weekend time at my family's place by the water and enjoying the summer.


We've finally sent the shell on its way to a new home. We tried to sell it for $100, then in exchange for a little beer, but FREE finally got it moving. It'll just be used for a rocker panel, but it saved us from having to chop it to bits, then rent a truck to haul it off to the scrapyard, just to break even on scrap/cost.


Since the car left, we cleaned up the garage, got tools de-grimed a little, and changed the setup to make room for part refurbishing. Here's the new view!


High on the list are suspension parts and trimming down the wiring harness. We're probably going to replace the rear lower control arms/lateral links. One bushing is shot, and the arm got a bit heat-treated in the process of freeing that long bolt. It'll also allow us some additional alignment adjustments. We're also trying to decide what other components we want to upgrade/replace. A limited slip diff is high on the list.